Saturday, July 30, 2011

Shabby Chic Baby Quilt

I'm done with my to-date most favorite quilt ever.  Inspired by calming pastel colors and a girlie feel. It took me a couple of days, but I even finished a coordinating pillow which I'm super excited about. Today, the quilt, tomorrow the pillow. =)

I started by making the squares and trying to figure out how I wanted to sew them together...

Eventually, I decided on the classic chevron pattern.  I sewed the squares into strips and then the strips onto each other making the quilt top.

Quilt top, Done!

Front

After making the quilt sandwich, basting, and binding, it was all done!

Back
For the back I used some scraps from the front and pieces thing together with a gray Kona solid.

At first I wasn't too sure about the purple stripped binding, I thought it may have been a little too strong, but now that it's on, I love it!

And that's it! All done!

If you would like to purchase this quilt you can do so by going to by ETSY shop here.

Friday, July 29, 2011

Sister Love

I just got back last night from seeing my sister and her new cute baby boy Daniel.  Seriously he is the most easy baby ever.  He just sleeps and sleeps unless he needs to eat or change his diaper. It was so nice to spend time with her for longer than a couple hours since that's what usually happens when you live so far away, but lucky for me I'll get to see her next weekend again for our family reunion. Also, I gave her the quilt I made for Daniel and she loved it!  So exciting!

On another note,  here is a couple pictures of my latest project.  A Shabby Chic Quilt!

I just have a little quilting left to do before the binding and I should be set.  Plus, I'm making a matching pillow with some scraps which is already making me so exited to finish this project!

Monday, July 25, 2011

House Potholders

Recently I've seen some very cute quilting squares in crazy shapes such as this and this and I wanted to join in on the fun, and since I don't have the patience, yet at least, to make a full quilt full of pretty pieced blocks, I settled for some potholders instead.  Check it out!
 I think the pieced house top took about a half hour to make, and it was totally random piecing.  It's my first try, so maybe next time there will be a plan before hand and the colors and pattens will match better, but, for the first time, I'll take it. 
  If you're interested in purchasing these check them out here!

Sunday, July 24, 2011

Pink!

I can't believe how much pink fabric I have now after finishing this quilt. I went to Fields not really knowing what I wanted but after looking at all the fabric in the pink section I new what I wanted to do.  A Pink Strippy Quilt!

I started out by cutting all the strips in varying lengths and arranging them so they looked good to the eye.


I sewed them together and after making the quilting sandwich I quilted them also in  a straight line pattern about a 1/4 in from the edge of each fabric.

Turns out that straight line quilting is slightly harder than I originally thought.  Mostly because there is just no room for mistakes.  You really have to pay attention and make sure everything is super straight.


I bound it in a pretty Kona solid, and you can kinda see the backing which is a light pink and white flannel so you know it'll be super soft after it's washed.

...and finally the final product.  Still needs to be washed in this picture and it's so much more crinkly and soft after it was washed. I definitely recommend washing the quilts before selling or giving them away. 

Tada!  and if you are interested in purchasing this little baby you can do so at my shop!

It measures 40"x40" washed and it should not shrink much more after more washes.

Saturday, July 23, 2011

New Stash

I bought some pretty new fabric!!!

What to make is the question! 
...and check out my store!

Wednesday, July 20, 2011

Weekend Fun


This past weekend was my sister-in law and cousins' 18th birthday which means lots of family time. When my husbands family gets together it's quite the gathering so for the most part I really don't get much done...but I did manage to make this cute little dress for one of the nieces. 


Didn't it just turn out great!? Although, how could it not considering she is such a cutie! =)


And a couple of close-up pictures.

For this heart I just cut out little hearts from scraps and zig-zag stitched them right on the dress.
It took about an hour although after finishing the dress my husband pointed out that the circumference of the chest area might have been a little small, and since I don't have kinds myself I just had to guess... so I let it out a little more and re-sewed the straps which took a little longer, but it was worth it at the end.

Monday, July 18, 2011

Pretty Pink Pillowcases

I'm trying to figure out what kind of items I want to make a lot of to sell on Etsy, I mean, I feel like people would be more apt to buy things that look like you're a pro at instead of random things you make even if they are still high quality.  Sooo... I'm still trying lots of different things, so until then you'll have to bear with me, but here are a pair of cute pillow cases currently on sale at my shop.  Check them out! Or, buy them here!

 And they even have cute little french hems!!
 Check out some of my other items here!

Sunday, July 17, 2011

My First Sale

I've been posting mostly in order of the projects I've made, even if they are a couple months behind because I really wanted to show the progress I've made with my projects, but it honor of my first Etsy sale I fell it's only right to post about my first sale!  So here it is.


I made two appliqued pillows; one for my friend Sara, which I noted in an earlier post, (and that matched the quilt I gave her) and another to sell since I liked the first one so much.   The second one sold.  So exciting! It makes me want to go to my sewing room and sew more, although I really have to go to bed soon so it'll have to wait, at least 'till tomorrow.


Both similar, yet a little different.  
The second one I got a little creative and added a pieced backing so I hope the new owner enjoys it as much as I.


And I know I'm kinda doing this backwards, but I just cut out a but of leaves from my scraps and a trunk and zig-zag stitched them into place on a 17x17 piece of while cotton.  That's how easy the front was!!

Thursday, July 14, 2011

Triangle Potholder

So I had some random scraps from the last couple quilts and decided to use some of them up to make a cute little potholder. It took me a couple of hours and lots of ironing but here it is!

I took 4 white 5x5 squares and 1 5x5 square of each of the four colors and made them into little half triangle squares.  The final potholder ended up being around 9x9.

The hook wasn't really planned, I kinda just got to the last edge and though, "Hey, I think I should put on in!".  I just folded some of the left over green I had, ironed it and folded in to place under the binding.

Again, this quilt was before the orange one for Sara so I still didn't get the concept of matching the color thread to the binding, but I think in this case it still turned out all good. =) And for the backing, just some plain leftover fabric.

I think I'm finally getting the whole binding thing! Probably the thing that's been the most difficult so far.

Tuesday, July 12, 2011

Disappearing Nine Patch

For my second quilt I thought I would try a new pattern and so I went with the easy disappearing nine patch quilt.  It's a little more complicated than the previous coin quilt, but still very easy for a beginner like myself. When it's all done you'll feel like you are a much better quilter than maybe you thought, or at least that's how I felt. I'll take you though the steps!

First I cut all my fabrics into 5"squares. I picked 7 different fabrics but for a more random look 9 would be the best. that way, when you attach the nine squares together (which I will show you next) you wont have to repeat any fabrics.

If you choose 9 fabrics you'll need just enough fabric to cut  four 5" squares for this size quilt. Less than 1/4 yard so you'll have plenty of scraps if you want to piece the back together.
Next,  you will need to sew all different nine fabrics together like this:
...and cut down the middle of this big square both horizontally and vertically.  When you do this you will get four disappearing squares.  You will need to do this three more times to get all your squares and then you will be able to move onto the next step.

Once you have all of your blocks set them out in the direction you would like to sew then and step back to make sure the colors look good and are arranged like you want them. Once you are ready start sewing the sashing (white) part of the quilt. 

The sashing was cut in 2.5" strips for in between the blocks and the left and right sides.  The sashing on the top was 4" just so the quilt did not end up square, although you could cut them all the same depending on what you plan to use the quilt for. Once the sashing is sewed on you may have to trim the sides to make the edges square unless you measured the outside piece perfectly.

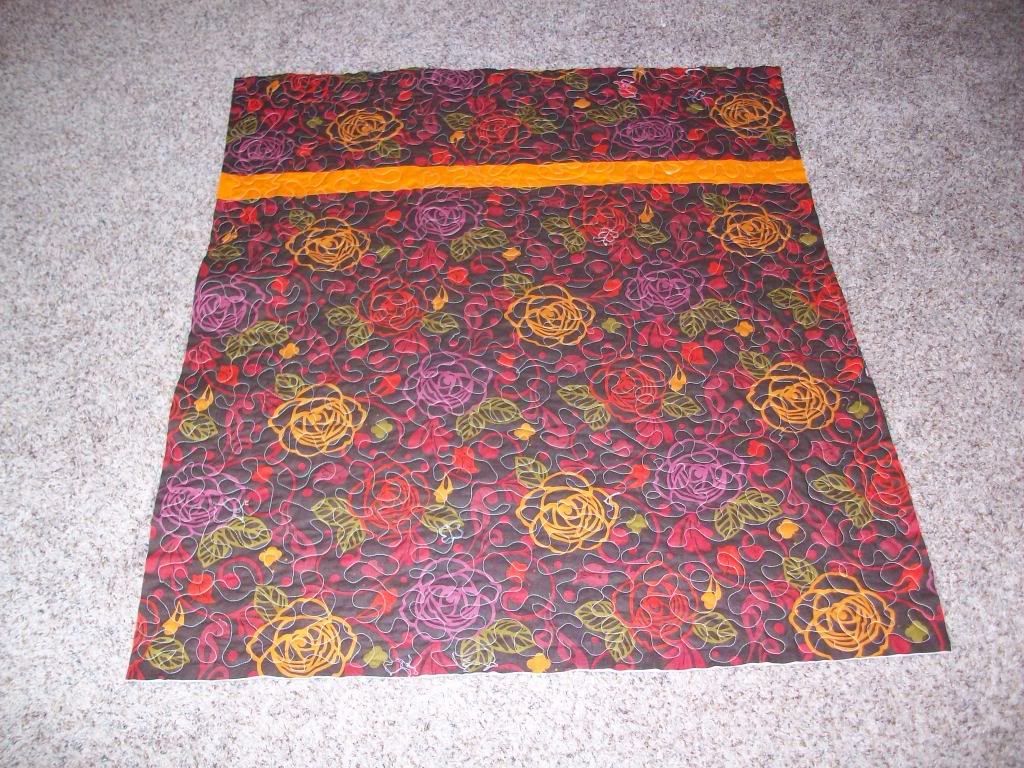
At this point you are basically ready to do your quilt sandwich, quilt and bind, however, I wanted my quilt slightly bigger and so I added more of the main fabric on the sides. Check out more more close ups and the finished product.

Some Pretty Stipling
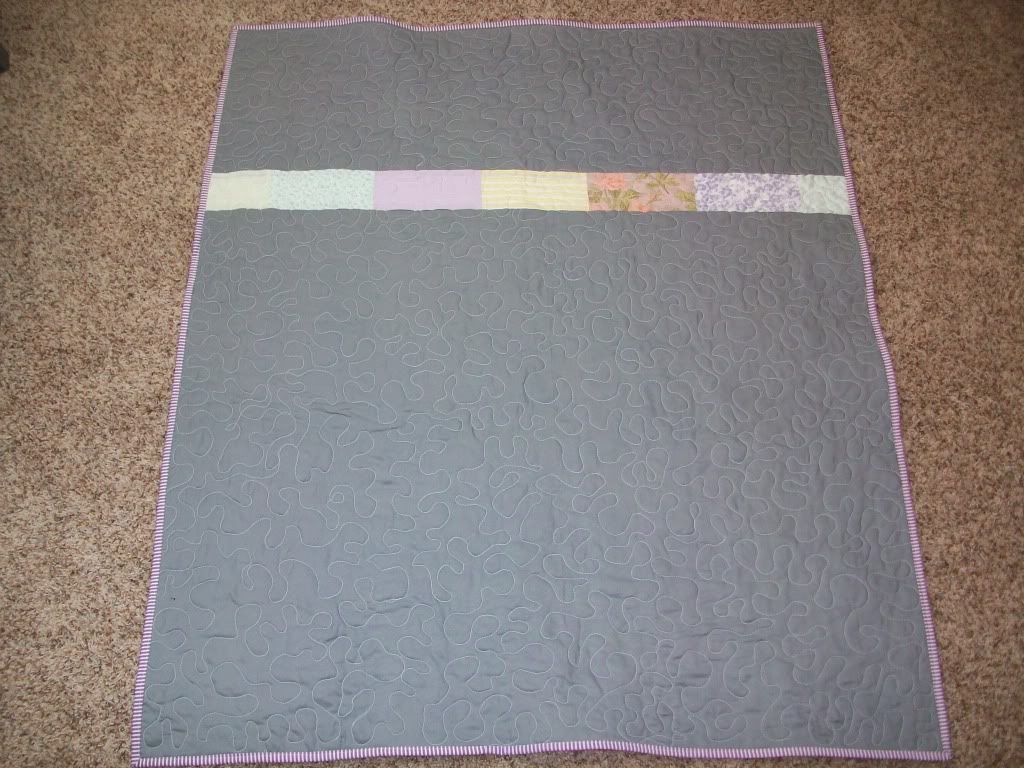
Back of the quilt ready to be bound
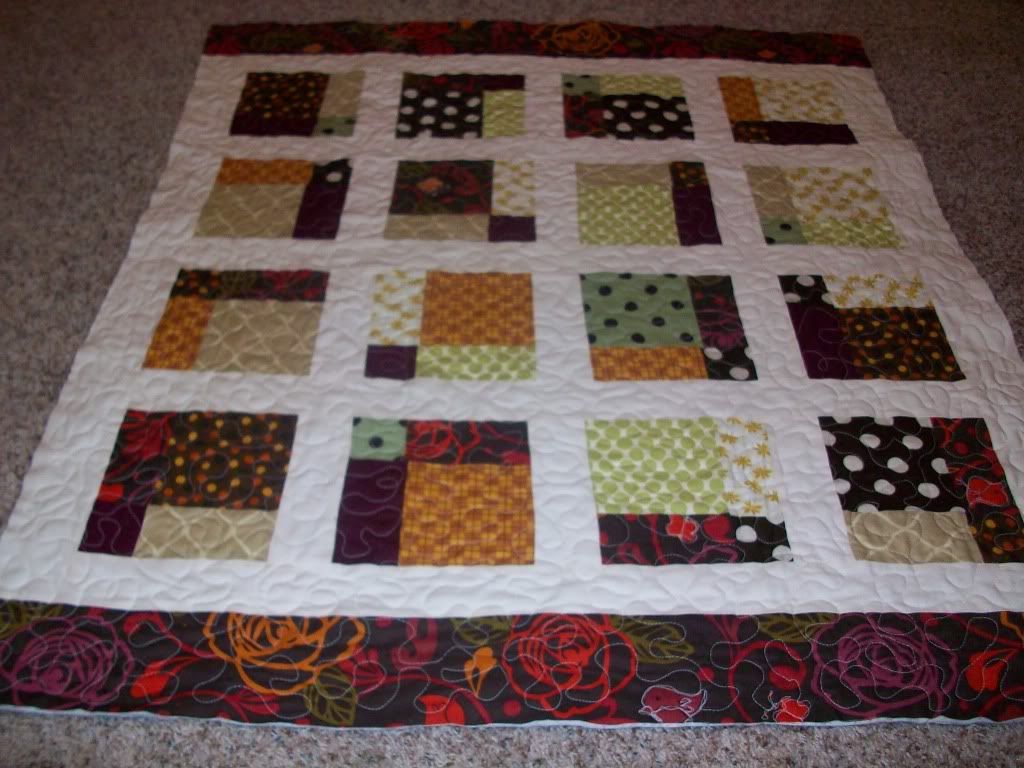
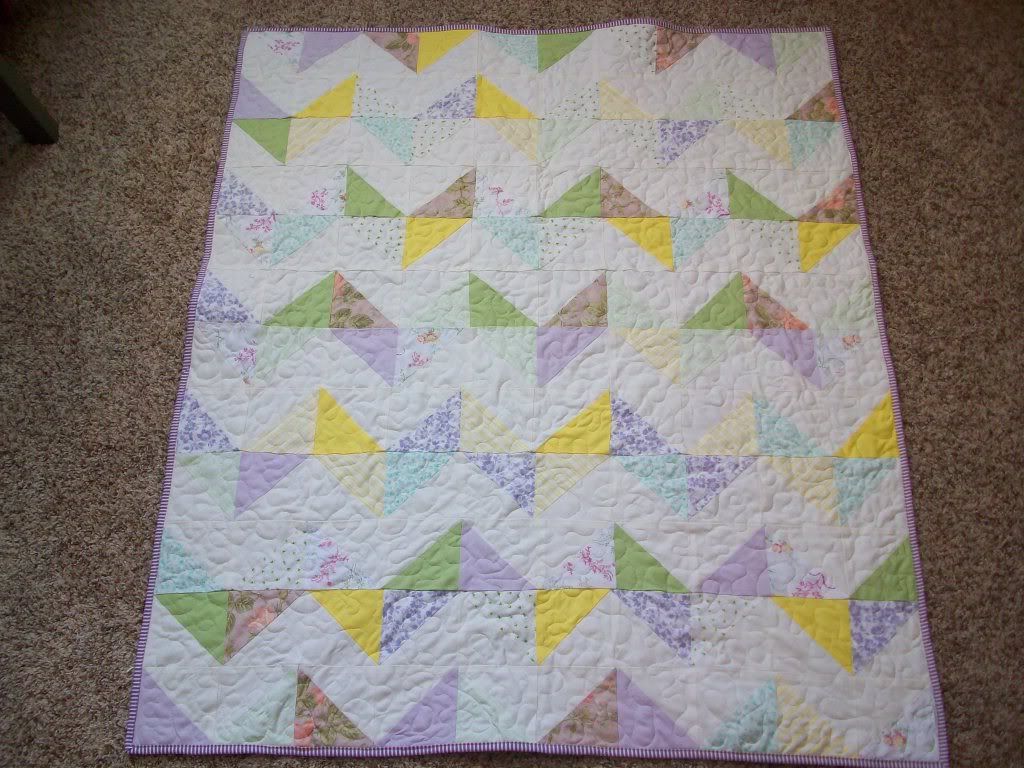
Front of the quilt all quilted

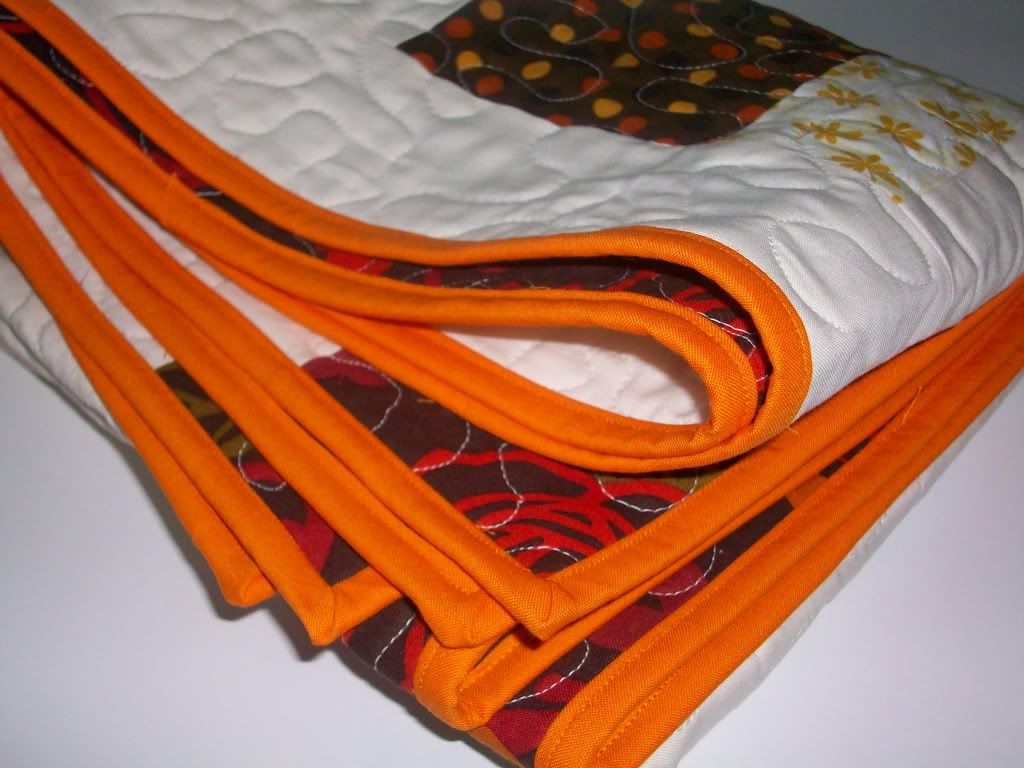
Binding by machine with same color thread as binding.
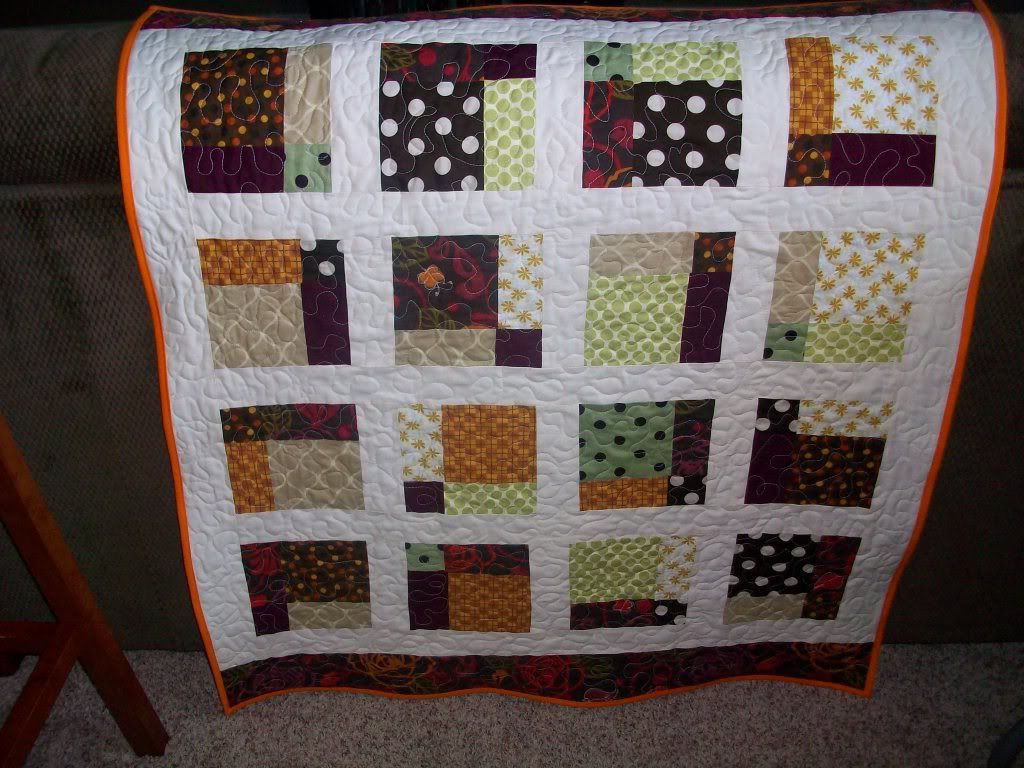
Finished Product
This quilt ended up going to my friend Sara down in Texas as a Thank You gift for having me over for a whole week.  We did have a great time there and to top it off, she loved the quilt!  Stay tuned for a matching pillow cover I also made her!
All done! =)
That should be it!  A note to make though, I obviously do my binding by machine but most people do not.  It's up to you which way you want to do it.  I'm impatient and so I machine bind it but if you have the time and patience to do it by hand, go for it! Good Luck!

Monday, July 11, 2011

A New Start

I'm so excited to finally start my own blog! I supposed this isn't my first one since I did have one waaay back in the day in high school however, lots of things have changed since then and this one will be much more different.

After much consideration about whether or not I wanted to start a new hobby I decided to go for it and I bought a sewing machine. In my line of work, I have a lot of free time and so searching the web until I get a call is mostly what I do. (Along with playing computer games, catching up on the blogs I read, and watching my TV shows) Recently though, and when I mean recently I mean the last six months, I have been looking at a lot of blogs of people creating beautiful things with their sewing machines.  Soooo, in getting to the point, I decided I wanted to start quilting, and sewing and crafting so here I am!

The first thing I tackled was my soon to be little nephew's new baby blanket, and although I had some rookie mistakes, I think it turned out pretty good.  So here are some pictures!

My first attempt at the ever so popular stippling technique.  It took a little getting used to and my arms were rather sore by the end of day one of two but eventually I think I got it for the most part.

What I did learn from this one is that the thread should be the same color as the binding for the most part.  I think that would have looked better and in later quilts it definitely shows.


And the finished product! All done and ready for baby boy to come!

...and check out my listings at http://www.etsy.com/people/Ccristinat