Thursday, May 31, 2012

Cake Pops!

Unfortunately the last couple of weeks have not been filled with a lot of cooking... mostly because I've been on vacation but I guess that's not all that bad.  We did a lot of eating out at restaurants in Texas and Arizona so it was fun to eat at new restaurants that we don't see as ofter around here. 
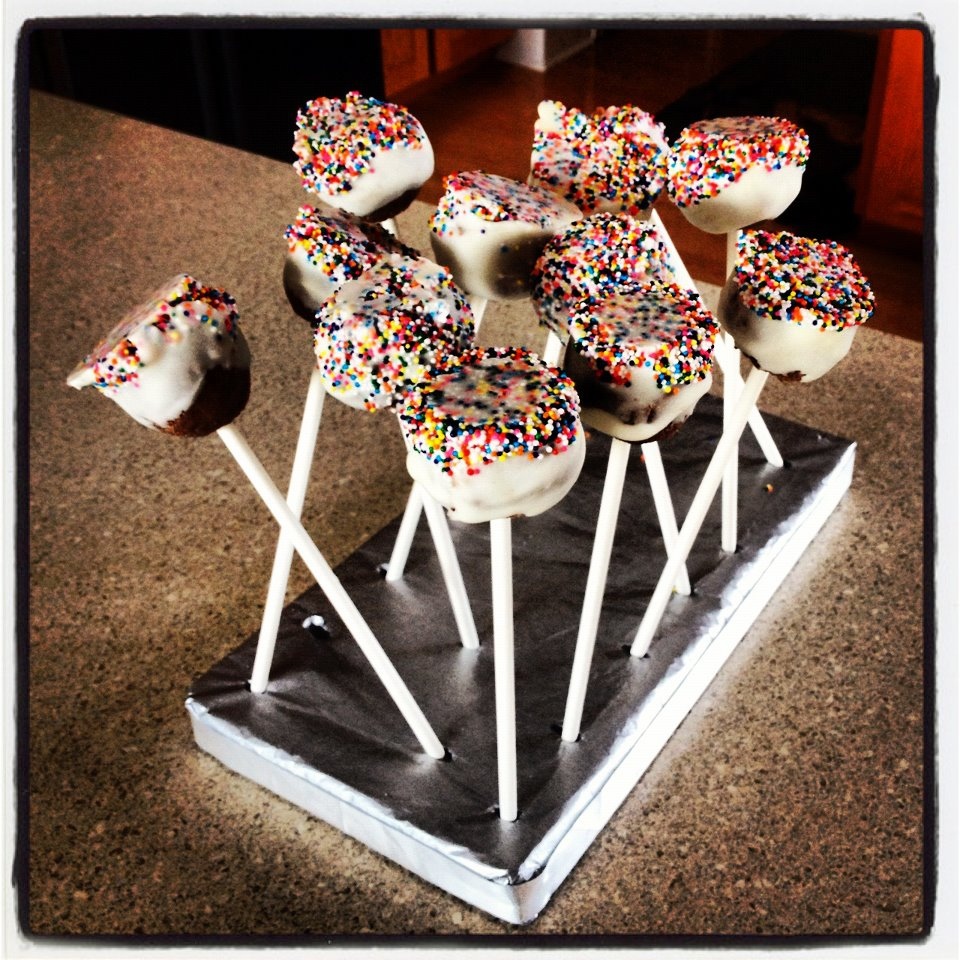
While I was in Arizona visiting my sister she introduced me to cake pops! They were delicious! They were so good that I decided I had to make my own version.  It was pretty simple too!

I didn't take pictures of my process and honestly I didn't even write much of a recipe down so I'll try to re-cap as best as I can. 
TIME: about 3 hrs
MAKES: about 25 cakepops

Ingredients: 
Lolipop sticks
Any kinds of your favorite chocolate
Box of cake mix
Container of frosting of your choice
Decorations for your cake pops

Directions:
1. Make your cake as directed of the box and let cook.  
2. Crumble your cake into a large bowl and mix with the whole container of frosting.  Put in the fridge to cool completely. 
3. Once the cake pop mix is cooled roll into 1in balls and set aside in a container that will eventually fit in your freezer. Freeze your balls completely. If you don't freeze them enough, when you stick the sticks through the balls they might break apart.
4. Take the balls out of the freezer and stick the sticks through them. 
5. Melt the chocolate and dip the cakepops in the chocolate.  You can even use a spoon to help you cover the balls. 
6. Finally decorate as you wish! I just dipped mine in sprinkles... just beware if you do sprinkles you may need more than you think you do so buy a couple of containers just in case.  You can always save the extra for another time. After you decorate, turn the cakepops upside down to cool slightly on some wax paper.  

So that's it! pretty simple but I must say it takes a little longer than I had originally thought it might. If you plan to make a lot of them I suggest maybe doing it ahead of time since they keep pretty well in the freezer for a couple of days.  

Friday, May 18, 2012

10 Minute Parmesan Steak

Say what?! 10 minute steak?  Yep, that's right.  
So there is no reason you can't make this any day of the week. 
Personally I don't like to grill.  The grill scares me.  The grill is for my husband.  But I do LOVE steak... so I had to figure out how to make it yummy, inside the kitchen, and fast.
...because you never know when you're gonna crave a juicy piece of meat.
Ok, so here it goes.

Ingredients: 
3 Steak - Mine were about the size of my hand (pretty big) about an inch think (also pretty big)
            Also, I did 3, you could do more or less, depending on how they fit in the pan.
1/2 C Parmesan Cheese
small pinch of steak rub for each steak
olive oil
salt + pepper

Directions: 
1. Heat your pan to medium-high and drizzle your pan with olive oil. Once the oil starts to sizzle you know it's time to put your meat in. Meanwhile, prep the meat.

2. You want your meat to be at room temperature so take your meat out of the fridge about 30 minutes before you want to cook it.  (No you don't have to do this but it will make it so the juices flow better when cooking) Lay the meat out on a plate/cutting board/tin foil (for easy clean up). Drizzle with olive oil and season liberally. More than you think, it's a thick piece of meat.


3. Once your pan is hot put it your meat seasoned side down.  Season the other side.  Also, if you have it around you can use a little steak rub on one side for a little extra flavor.  I just add it like I would salt.  If you don't have any around, the skip it.  Keep it simple. 

Let this side cook about 5 minutes for medium.  More or less depending on how well you want the meat cooked.  Flip your meat and lower your temp to medium.  Add the parmesan cheese right on top. Cook side two about 3-4 minutes with the top on and let the cheese melt into a crusty crust.


4. Take the meat out of the pan and rest 3-5 minutes so the juices can soak into the meat.  If you cut the meat right away the juice will run all over the cutting board and not in your mouth and trust me, you want juicy steak. 

I ate just a half of one of the steaks, my husband a whole steak.  I would say one steak is plenty for one person so you can make more or less steak depending on how many people you're feeding. 
Also, these were served with a baked potato and the mixed veggie medley previously posted.


And... ROUND TWO! 
If you make extra you can even make a left over steak sandwich.  Cut the steak into slices with a little light mayo, tomato and lettuce.  Put it on a ciabatta bun and there you have a nice little sandwich!

Friday, May 11, 2012

Mixed Veggie Medley

Today is all about simple... and pretty healthy too. It wasn't until I was married and started going to nicer restaurants that I realized vegetables could actually taste pretty delicious.  In college the only vegetable I would even touch was corn... and my Mom used to tell me that wasn't really even a vegetable, so when I found out you could actually eat them without spitting them back out I jumped all over that wagon.  Here is a recipe for a simple veggie medley.  What's great too is you can pretty much change the kind of vegetables you want depending on what you have on hand, but this is my favorite combination.

Ingredients: 
1lb brussels sprouts
1lb baby carrots
1/3 C bacon bits
olive oil
salt + pepper

Directions:
1. Pre-heat your oven to 400F.  
Prep your veggies; Cut your carrots in half and quarter or half your brussel sprouts depending on how big they are.  You want to make sure they are about the same size so they cook evenly. 

2. Line a cookie sheet with tin foil and put your veggies right on top.  Drizzle them well with olive oil and season your veggies with some salt and pepper.  As Paula Deen once said before, you want the brussels sprouts to be coated with salt like you would coat popcorn.  Obviously that's not the healthiest thing on earth, but it does sure taste better.

3. Finally drizzle the veggies with some bacon bits for a little meaty taste (or leave them out if meat is not your thing).  (Also, my husband wanted to let everyone know that real bacon tastes much better than bacon bits, so if your husband thinks that too, and you feel like getting your kitchen all greasy just to make some REAL bacon... feel free.  Personally I think bacon bit are juuuust fine. =) 

Now, get your hands dirty because it's time for you to mix everything together well.  Toss the veggies around so they are evenly coated and seasoned. Pop them in the oven for 35 min at 400F. Once that's done, but the broiler on low for 2 mins for a little crunchy bite.

Enjoy! 
Three simple steps for some mouthwatering veggies. And hey, maybe even kids could get used to veggies this good!

Wednesday, May 9, 2012

Rehearsal Dinner

I'm so excited for my vacation coming up but planning for more than a couple days is sooo daunting for me.  I just feel like I can never pack enough since I'm constantly changing my mind on what I should be wearing.  Did it get cold? Should I wear a jacket now? What if that jacket doesn't match what I had already planned? Do I even feel like wearing this outfit anyway?  Ugh... I wish you could take your closet with you on trips...

I did however find a great way to decide what to wear.  Have you guys heard of polivore.com?  It's so great because you can find pretty much any piece of clothing in your closet and mix-and -match items right on your computer... which really saves a ton of time trying things on constantly. So here it is, my first outfit for this great trip.  Sara's rehearsal wedding dress!
...and, isn't it just so Texas!?


Rehearsal Dinner


Monday, May 7, 2012

Not Your Mamas (Mini) Cheesecake

Dessert sounded pretty good today and Cheesecake is one of my favorite ones.  Most of the times I can't just have one proper slice of cheesecake. I usually say it's one but I cut the "one slice" about three times too big.  This recipe makes it easier to just stick with one serving... although you might be inclined to take two since they are so delicious.

Ingredients:

- Crust:
5 plain graham crackers (if you want to get super creative, maybe use some cinnamon sugar ones) yumm!
3tbl brown sugar
3.5 tbl butter, melted
small pinch of salt

- Cheesecake:
8-oz cream cheese, softened
1/3 (heaping) cup sugar
1 large egg
1.5 tsp vanilla extract
chocolate chips

Directions:
1. Pre-heat your oven to 350F and line your muffin pan with some pretty little liners. To prepare your crust start by crushing your graham crackers in a bowl.  I used a meat mallet which seemed to work pretty well but you way be able to get away with a mug or another sort of sturdy flat bottom item.

2. Once the crackers are crushed, add the rest of the crust ingredients and mix together well.  This will be slightly crumbly so don't worry if it doesn't turn into your typical doughy like crust.


3. Mix together your cheesecake ingredients except your chocolate chips.  Beat together until there are no more lumps.
4. Now you are ready to assemble your cheesecakes.  First, evenly fill the bottom of your muffin cups and push them down with your fingers so is it tightly packed.  Leave about just enough left over to top the cheesecakes at the end like a crumple.  Maybe 1/3 ish of a cup.  Follow the crust by adding a couple of chocolate chips.  Evenly divide cheesecake batter and top with a couple more chocolate chips.  Finally, top with the rest of the crust crumble.


5.  Bake 20-25mins until cheesecakes are golden brown on top and are set.  The batter should not jiggle when you shake the pan.  Let cool and enjoy!